🤖 Disclaimer: This post was written with AI assistance. Sections where the AI generated the majority of the content from my outline notes are colored accordingly: AI-expanded text appears in this color.
This is a draft. I’m publishing it early because I’d rather get something useful out there than wait for perfection — but I want to be upfront: some sections still contain AI-generated slop and outright hallucinations that I haven’t fully fact-checked or rewritten yet. I used AI to help me get the structure and initial content down, and while the core advice reflects my real experience, there are passages where the AI got way too confident about things I haven’t personally verified. If something reads like generic filler or makes a suspiciously specific claim, trust your gut — it probably needs work. I’m actively revising this, so bear with me.
In a way, I’m sorry you’ve arrived here. In another, I’m genuinely happy. I’m sorry you’re dealing with elbow problems, but I’m thrilled you’ve made it to this page because I wrote it just for you. I want to provide you with useful resources and tips to get your elbows feeling strong and healthy, and to get you back to climbing. Most importantly, I want you to know that you are not alone, and you can beat this.
What is this article? I’d summarize it as a personal account of one climber’s road to recovery from the elbow pain that plagues our community, accompanied by a wealth of resources and anecdotal advice on how to overcome it.
I am not a medical professional and I am by no means an elite climber, but along my journey to recovery I’ve consumed just about every resource out there, met with five physical therapists, and spoken with countless climbers who have suffered the same fate. As such, I’d like to believe this article does a better job than most at helping navigate the multitude of one-liner magic cures you’ll hear — some of which will even contradict each other — and may serve as a comprehensive guide for how to holistically change your habits in order to overcome your injury.
Disclaimer: I am not a medical professional, and much of this is the anecdotal account of one individual. If you have any doubts — especially if you are in the initial acute phase of elbow pain, or considering medication and/or supplements — consult with a professional.
Diagnosis
Before we dive in, let’s make sure this article is for you. Do you have elbow tendonitis? The technical term is epicondylitis, specifically:
- Lateral epicondylitis (tennis elbow) — pain on the outside of the elbow
- Medial epicondylitis (golfer’s/climber’s elbow) — pain on the inside of the elbow
The main symptom is going to be an achy pain or heat right on the epicondyle or in the vicinity of it. Prodding around in the forearm with your thumb, you’ll usually be able to find some trigger points or muscle lines that are particularly sore and sensitive.
Epicondylitis is a chronic overuse injury, so unlike an acute injury such as a pulley rupture, this isn’t going to switch from healthy to injured in a single climbing session. That said, the noticeable symptoms may onset more abruptly than you’d expect.
If this is hitting close to home, welcome to the ever-growing mass of climbers that have suffered from this very, very stubborn injury. This article is for you.
Don’t Lose Hope
I had my first flare up about two years ago. I was doing laps on auto belay in the gym and my elbows just started feeling hot. I didn’t think too much of it, but one or two sessions later I was lead climbing when this heat turned into pain that onset so aggressively I had to immediately come down. I was no stranger to injury, having had surgeries on a torn rotator cuff and twice on a torn ACL, but this was different.
I went to a doctor and had some other nagging issues diagnosed while I was there. As it turned out I had lateral epicondylitis in both elbows, Dupuytren’s contracture in both hands, and a ganglion cyst on the PIP joint of my left index finger. I was instructed to immediately stop climbing, and after speaking with some other climbers I was told to get ready for months — or even years — without climbing. That elbow tendonitis could be the defining ceiling to my climbing performance.
I didn’t know what to do with myself. I had effectively built an identity around climbing. All my friends were climbers, and it was the single thread that had strung together all of my relationships, activities, and life decisions outside of work. I immediately spiraled into thoughts of despair. I was 27 at the time, and I felt like my body was giving up on me. Is this what it means to age? To be plagued with overuse injuries that show their ugly heads every time you get too excited about your life’s passion? And let’s say I was able to find a way to continue climbing by switching to alpine adventures — would that mean I had reached my physical peak and shifted into a phase of constant fear of imminent elbow pain?
This didn’t happen all at once. It went on for months… over a year. I kept learning more and more about my injury. I kept diligently following the recommendations for recovery. I tried every suggestion that came my way. But it always came back. Especially anytime I tried hard.
Most every resource would recommend a handful of prescribed actions as remedy:
- Stretch, massage, and ice. Nope.
- Tape, massage, and use a FlexBar. Still nothing.
- Do this stretch for your neck. Oh, that’s working! …wait, no. Never mind.
It was easy to lose hope. I eventually reached a point where any time someone tried to give me advice I just got angry and shut down. But this is why I’m writing now. Because I want you to know that you shouldn’t lose hope. You don’t have to give up your passion for climbing. You may have to spend some time focusing on recovery, but in doing so you are going to educate yourself and get to know your body in ways that will take you to new heights.
I’m excited to say that I am now free of elbow pain, at the peak of my fitness at age 29, and I just sent my personal best redpoint. What’s more, I now see clear-as-day the path to continued progression, and throughout this journey I’ve developed an even more profound appreciation for this awesome sport we all love.
Paradigm Shift
So what does it take? If none of these remedies work, then what does?
It starts with a paradigm shift in your relationship to climbing. Odds are that if you’re facing tendonitis you’ve gotten pretty into climbing — enough to develop a chronic overuse injury, to say the least. Regardless of whatever level you’re climbing at, you’re probably putting in considerable effort, or volume. And perhaps you’re also training in some fashion beyond simply climbing regularly. Maybe you’re training a lot. But would you consider yourself a knowledgeable climbing athlete? How much do you know about human anatomy? What about in the context of climbing? Are you acutely aware of the day-to-day changes in your body? How much do you really know about the purpose of a hangboard, how to properly use it, and with what frequency?
You’re going to need to educate yourself. A lot. You’re going to have to get familiar with your body. And start to think more critically about how your climbing is structured — on both the day-to-day micro scale and the year-over-year macro scale.
Sorry to break it to you, but you cannot cure tendonitis after reading one article. Sure, I’ll try to lay down as much as I can to get you started, but really, this is a continuous journey. The great news is that if you are persistent, you can continue to enjoy rock climbing throughout your entire life.
And this isn’t just advice for amateurs. Sam Elias had just put down a 5.14c before he got injured and realized he needed to go on a “knowledge quest.”
If there is one thing I could leave you with, it is the hope and excitement to start this knowledge quest — to learn how to simultaneously take care of your body and reach your potential. The rest of this article could effectively be considered a jump start on your journey.
The Big Four
This guy just criticized all these other articles for listing “the three things you must do” and now he’s going to give me the same crap??? Oh… I see how it’s different… there’s four.
I know. I get it… but still, I think lists are helpful, so I made one.
- Educate Yourself
- Structure Your Training
- Perform Supplemental Exercises
- Know Your Body
Educate yourself. The more the better. Read books. Listen to podcasts. Get on YouTube. Talk to climbers. Anything you can learn about anatomy, physical training, injury prevention, and all of these things in the context of climbing. But don’t limit yourself to climbing resources — there’s a wealth of knowledge about general fitness and mobility training, patterns and good practices to be observed. Just be careful taking tried-and-true strategies for large muscle groups and applying them to your fingers.
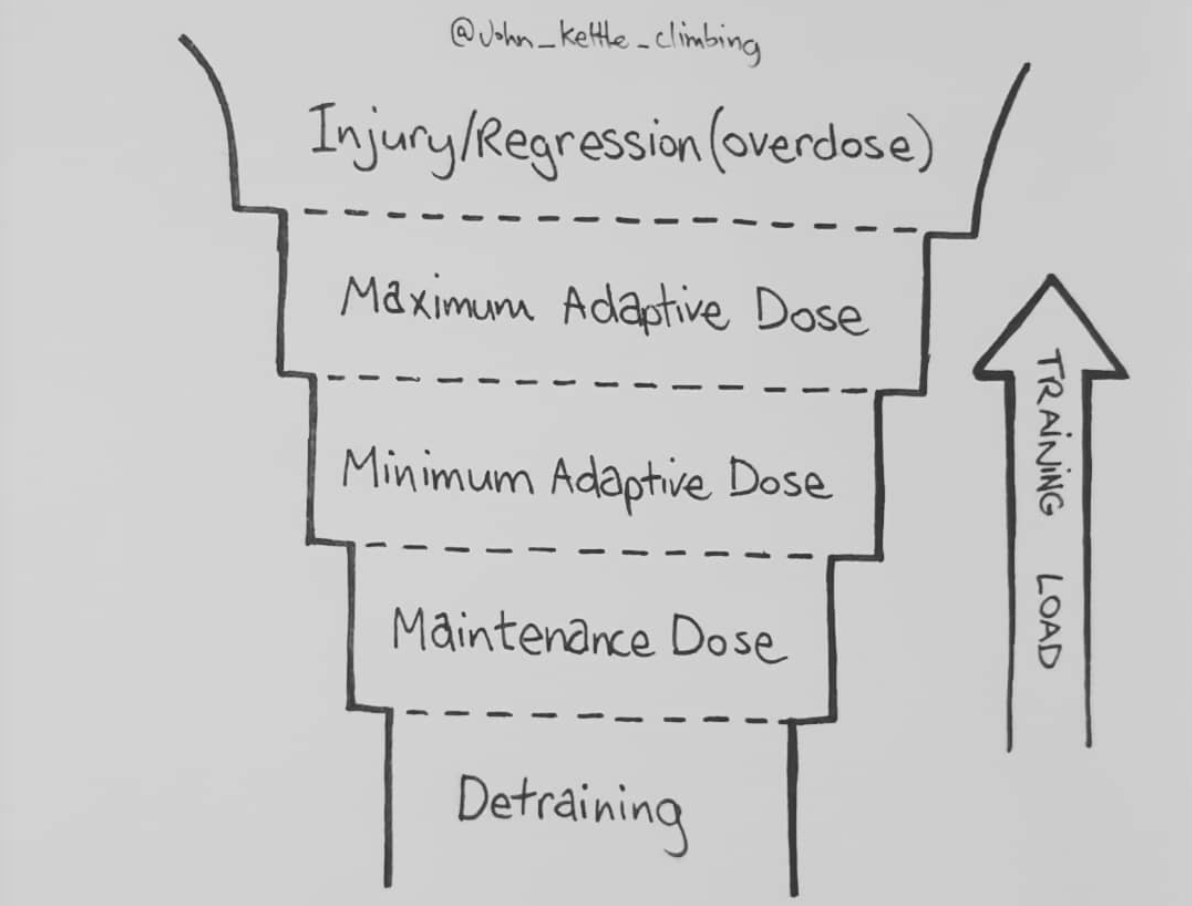 Credit: @john_kettle_climbing — read his description in the link!
Structure your training. The aim of the game is to stay in the sweet spot between detraining and injury. This is going to take a lot of trial and error, but you simply cannot afford not to start using periodized training programs. More on this below.
Perform supplemental exercises. If longevity is the goal, supplemental exercises can be assumed mandatory. I break these down into two subcategories: injury prevention and base fitness. There is a lot of talk out there about antagonist exercises, but as far as I’m concerned, these can just be bunched into the base fitness category. More on this below.
Know your body. Do you know the science of swimology? It is one thing to study, and another to experience. Monitor your body day-to-day. Massage and observe where you are sore. Learn the difference between an acceptable level of discomfort and a level that indicates something is not well.
By now you may have noticed that all of these “big four” are continued practices. None of them stop when tendonitis eases up. Of course there is ebb and flow, times when we are more or less disciplined, but each of these is something to pursue for a lifetime.
A Note on Where I’m Coming From
A lot of what we’re going to get into comes indirectly from the mouths of professionals, to me, to you, but some is also very specific to myself and should be taken with a grain of salt — particularly if you are very different from me. As such, I thought it would be helpful to give you some context.
I am an avid rock climber who has been involved in the sport for essentially my entire life. I wasn’t one of those “team kids” crushing every project at the local crag, but my dad took me on wild multi-pitch adventures in the Gunks and Adirondacks of upstate NY from a very young age. This resulted in my head-game and technique being advanced for my level, with my strength typically lagging behind my peers. Since then I have become progressively more addicted to the sport. My tendonitis started while living in Michigan, where I was logging lots of hours at the gym due to the lack of outdoor opportunity. I was making good progress with training, but I didn’t have much structure beyond “do all the hard things all the time.”
Some stats: 29, male, 6’0”, 160–170 lb, +4” wingspan.
One detail worth noting: I’m hypermobile. Not circus-performer level, but I have good range of motion off the couch. I think this has made me predisposed to injuries like dislocating my shoulder, hyperextending my knee (and tearing my ACL), and now tendonitis. As such, I’ve found that stretching certain joints is not critical for me, and that I have to be very careful not to hyperextend my elbows — even for something like planche training, where proper form is supposedly locked elbows.
It took me years to figure this out and recognize how to adapt advice to fit my unique traits. What traits do you have that may have made you prone to tendonitis?
Elbow Fundamentals
Let’s have a quick lesson on the basics. As mentioned, the technical term for this injury is epicondylitis. Lateral epicondylitis refers to pain on the outside epicondyle (the bony protrusion), connected to the forearm extensors, which pull the wrist backwards. Medial epicondylitis refers to pain on the inner epicondyle, connected to the forearm flexors, which pull the wrist downwards.
Overuse and improper recovery can lead to micro-tears in the tendons attaching the extensors and flexors to the epicondyles. In the first 6–8 weeks this is an inflammatory process called tendonitis. Beyond 8 weeks we call it tendonosis. It would be inaccurate to consider tendonosis as just “stubborn tendonitis” — the condition changes to something chronic. At this point the tendon is failing to properly repair. It’s going to require stimulation to trigger the repair process of synthesizing new, healthy tendon collagen.
Why Lateral?
Okay, medial epicondylitis makes sense. As climbers we’re constantly contracting the forearm flexors to grip hard on tiny holds. But why is lateral epicondylitis so prevalent as well?
One factor is that the wrist is a complex joint. Consider the elbow, which can be described as a “dumb joint” — it has only one motion, back and forth. To bend the elbow one simply engages the bicep; during this contraction the tricep remains relaxed. Similarly, to straighten the elbow the tricep engages but the bicep does not. Contrary to the elbow, the wrist has a wide range of complex movements: up, down, side to side. When the wrist is pulled downward, contracting the forearm flexors, the forearm extensors engage as well, in order to stabilize the wrist.
But there’s another factor, which I theorize is more important.
Think about the last time you tried opening a really tight jar. Where did you hold it? Did you have your arms straight out? No — you probably bent your elbows and held it close to your waist so you could really “get over it.” As it turns out, your grip strength is greatest when your wrist is cranked back. I wrap my head around this by thinking of it as pre-loading the flexor group.
Put your hand out in front of you, palm down. Pull your wrist down as much as you can — what happens to your fingers? Are they straight or bent? Now pull your wrist back as much as possible — what are your fingers doing now? If you have any doubts (thinking maybe this is just gravity at work), turn your wrist palm up and do the same thing.
There is very little muscle in the hands, particularly in the fingers. It’s more like a puppet show manipulated by the forearm marionettes. When your wrist is pulled back, thanks to engagement of the forearm extensors, the flexor group is in a maximally pre-loaded state — which is why the fingers want to contract in. There is no extra “string” to allow the fingers to extend. When the flexor muscles now engage, the fingers have already been contracted a significant amount, and thus this extra contraction pulls in that much harder.
Yes, you are right. This is exactly what chicken winging is, although with a different order of operations. Imagine you’re getting pumped on a crimpy climb and your forearm flexors are already maximally engaged. If your wrist is in line with your forearm, you can still pull those strings of the fingers back a bit harder — not by contracting the forearm flexors harder, but by moving them further away from the ends of the fingers. And thus the elbow works its way up higher as you try desperately to cling onto the hold.
Between wrist stabilization and this pre-loading, chicken-winging effect, I would argue that the latter is the bigger culprit. It just feels more apparent if you play around with these movements. And I’ve definitely noticed it climbing as well. This is good news because, unlike wrist stabilization, elbow position is something you can modify in your climbing to reduce the load on your forearm extensors. Think of it maybe like full crimping — something that should be minimized during training, despite the fact that we all know we’re going to hunker down on that limit project. The difference is that chicken winging is more due to fatigue; if your elbows start to escape your sides while climbing indoors, get down immediately. It’s time to rest.
Acute Phase
If this is your first time with tendonitis (remember, it is correct to call it tendonitis during this acute phase), go see a therapist. You need to make sure you are properly diagnosed and that immediate action is taken to mitigate the issue.
This is also the one time that I would recommend not climbing whatsoever. You’ve developed an overuse injury, so you need to immediately alleviate the stresses that are causing it. That could be climbing too hard, climbing too much, or likely a combination. Even calisthenics can be problematic for elbows and should be paused.
You need to consider anything and everything that could be causing strain. In this acute phase, it’s possible to be very sensitive. How are you sleeping? If you wake up with your wrists bent down like a T-rex, you’re spending the entire night in a position that loads the forearm extensors. Ideally, sleep on your back with your arms at your sides, wrists neutral. Stick a pillow under your knees to help discourage you from turning. Do you work on a computer? Typing can be another problematic habit. Get an external keyboard that can be raised on the side closer to you, so your wrists can bend down instead of constantly being pulled back and lightly engaging the extensors. Also try to change things up — having your hands at exactly the same position on a keyboard for 8 hours a day is bad, regardless of what that position is.
Transitioning Out of the Acute Phase
Once you start to reach that 8-week point (give or take, at the discretion of your physical therapist), you need to start shifting towards long-term practices for maintenance and recovery.
Barring that initial unloading phase, I have some important and exciting advice for you: DON’T STOP CLIMBING! You’re going to have to take it very light at first, and back off the volume and intensity any time your symptoms get worse, but a little discomfort is okay. It’s going to take a long time for you to get attuned to what your body can handle as sufficient stimulus for recovery without regressing with further damage. Recall that this phase is now considered tendonosis — it is not going to go away if you do not properly stimulate the repair process. I have heard too many stories, myself included, of taking swaths of time off from climbing only to have the elbow pain return as soon as you get back on the rock.
So the next sections all relate to good practices during the chronic tendonosis phase and after recovery. You’re going to have to start easy and be ready to adapt to your body’s response as you experiment with increasing the loads. Get excited — you’re about to learn so much about your body, and even better, you’re going to get some climbing in along the way.
Periodized Programs
I remember being back in Michigan, before my elbow issues, when a friend proposed that we try the Rock Climber’s Training Manual Rock Prodigy training program. She described it as this “crazy regiment” where you spend a whole month just hangboarding. Sounded about right at the time. In retrospect, I would call it crazy not to follow one of these programs.
Do you periodize your climbing? Or are you asking what that even means? Periodized training is a practice of changing things up, so as to avoid plateaus and mitigate risk of injury. It can be as simple as changing your day-to-day activities — limit bouldering one day and getting lots of volume on easy rope climbs the next. This is called daily undulating periodization (DUP). Or it could be as complex as a months-long program where every day is planned to a T. If you’re going for the latter, just keep in mind that if this is your first time you will guaranteed need to adapt something, especially if you’re still recovering from an injury.
There is so much to learn here, but as an example, the Rock Climber’s Training Manual provides a heuristic to follow a 4:1 climbing-to-campusing ratio during the power phase — for every minute of campus training you spend four minutes bouldering. Sure, it’s just a heuristic, but it’s an incredibly valuable starting point to reduce your risk of injury while campus training.
Rick Richey with the National Academy of Sports Medicine (NASM) has a great podcast series to get your brain crunching:
Where should you start? There are a lot of resources out there. While I don’t want to imply that in the long term it’s necessary to follow a strict program, you’d do well to follow one for at least a couple macro-cycles. (A macro-cycle is the months-long program broken into multi-week meso-cycles and day-to-day micro-cycles.)
RCTM: The Anderson brothers’ Rock Climber’s Training Manual (RCTM) is an excellent resource and particularly something I’d recommend for beginners as it is very structured. By this point I’ve memorized that page 184 has the example training programs mapped out day by day for both beginner and advanced trainees. This book is dense, but each phase-specific chapter starts with a technical background section that can be skipped if you just want the exercises, and you’ll have plenty of time to read each chapter before that particular phase begins.
NASM OPT Model: The National Academy of Sports Medicine’s Optimal Performance Training (OPT) Model is a framework for periodizing general fitness. It’s a bit gimmicky in that a lot of the resources try to sell you on personal trainer certification, but nonetheless it’s a good model. If nothing else, refer to the “resistance” column of tables 14.7–14.11 in this study guide. I like using these guidelines for reps, sets, tempo, and rest interval for supplemental exercises accompanying a climbing phase. For example, pair OPT’s stabilization endurance exercises with RCTM’s base fitness phase, and OPT’s hypertrophy, max strength, and power exercises with RCTM’s strength, power, and power-endurance phases, respectively.
T4C: I haven’t yet delved into Eric Horst’s Training for Climbing (T4C), but I would say it is the leading competitor to RCTM. Not that you should choose one over the other when you can read them both. The programs are generally shorter, spanning only ~6–10 weeks in contrast to RCTM’s 17-week program, and Horst talks about his programs as building blocks that can be adjusted and stacked together to fit your schedule. I’d recommend reading this after RCTM because of the higher degree of flexibility — the onus is on you.
Some other resources I’ve been looking forward to exploring:
- Lattice Training — They offer more than just awesome YouTube videos. They have personalized training programs at affordable prices. I played around with the Crimpd app and was a bit disappointed with the lack of customization (e.g., ARC training sessions had to be exactly 20 minutes), but I still look forward to going all in on a Lattice program for a few months.
- ClimberFit — I don’t know much about Alex Puccio’s 6-week program, but I’m curious to try an app-based program. Frankly, I’ll take any advice the Pooch has to offer.
- The Climbing Bible — A relatively new entry in the running for ultimate comprehensive training guide, published in Fall 2020. I look forward to adding this to the library.
Looking for something more intimate? Go to your gym. Here in Albuquerque there are bouldering training programs for adults, as well as personal trainers for those who are interested.
Climbing
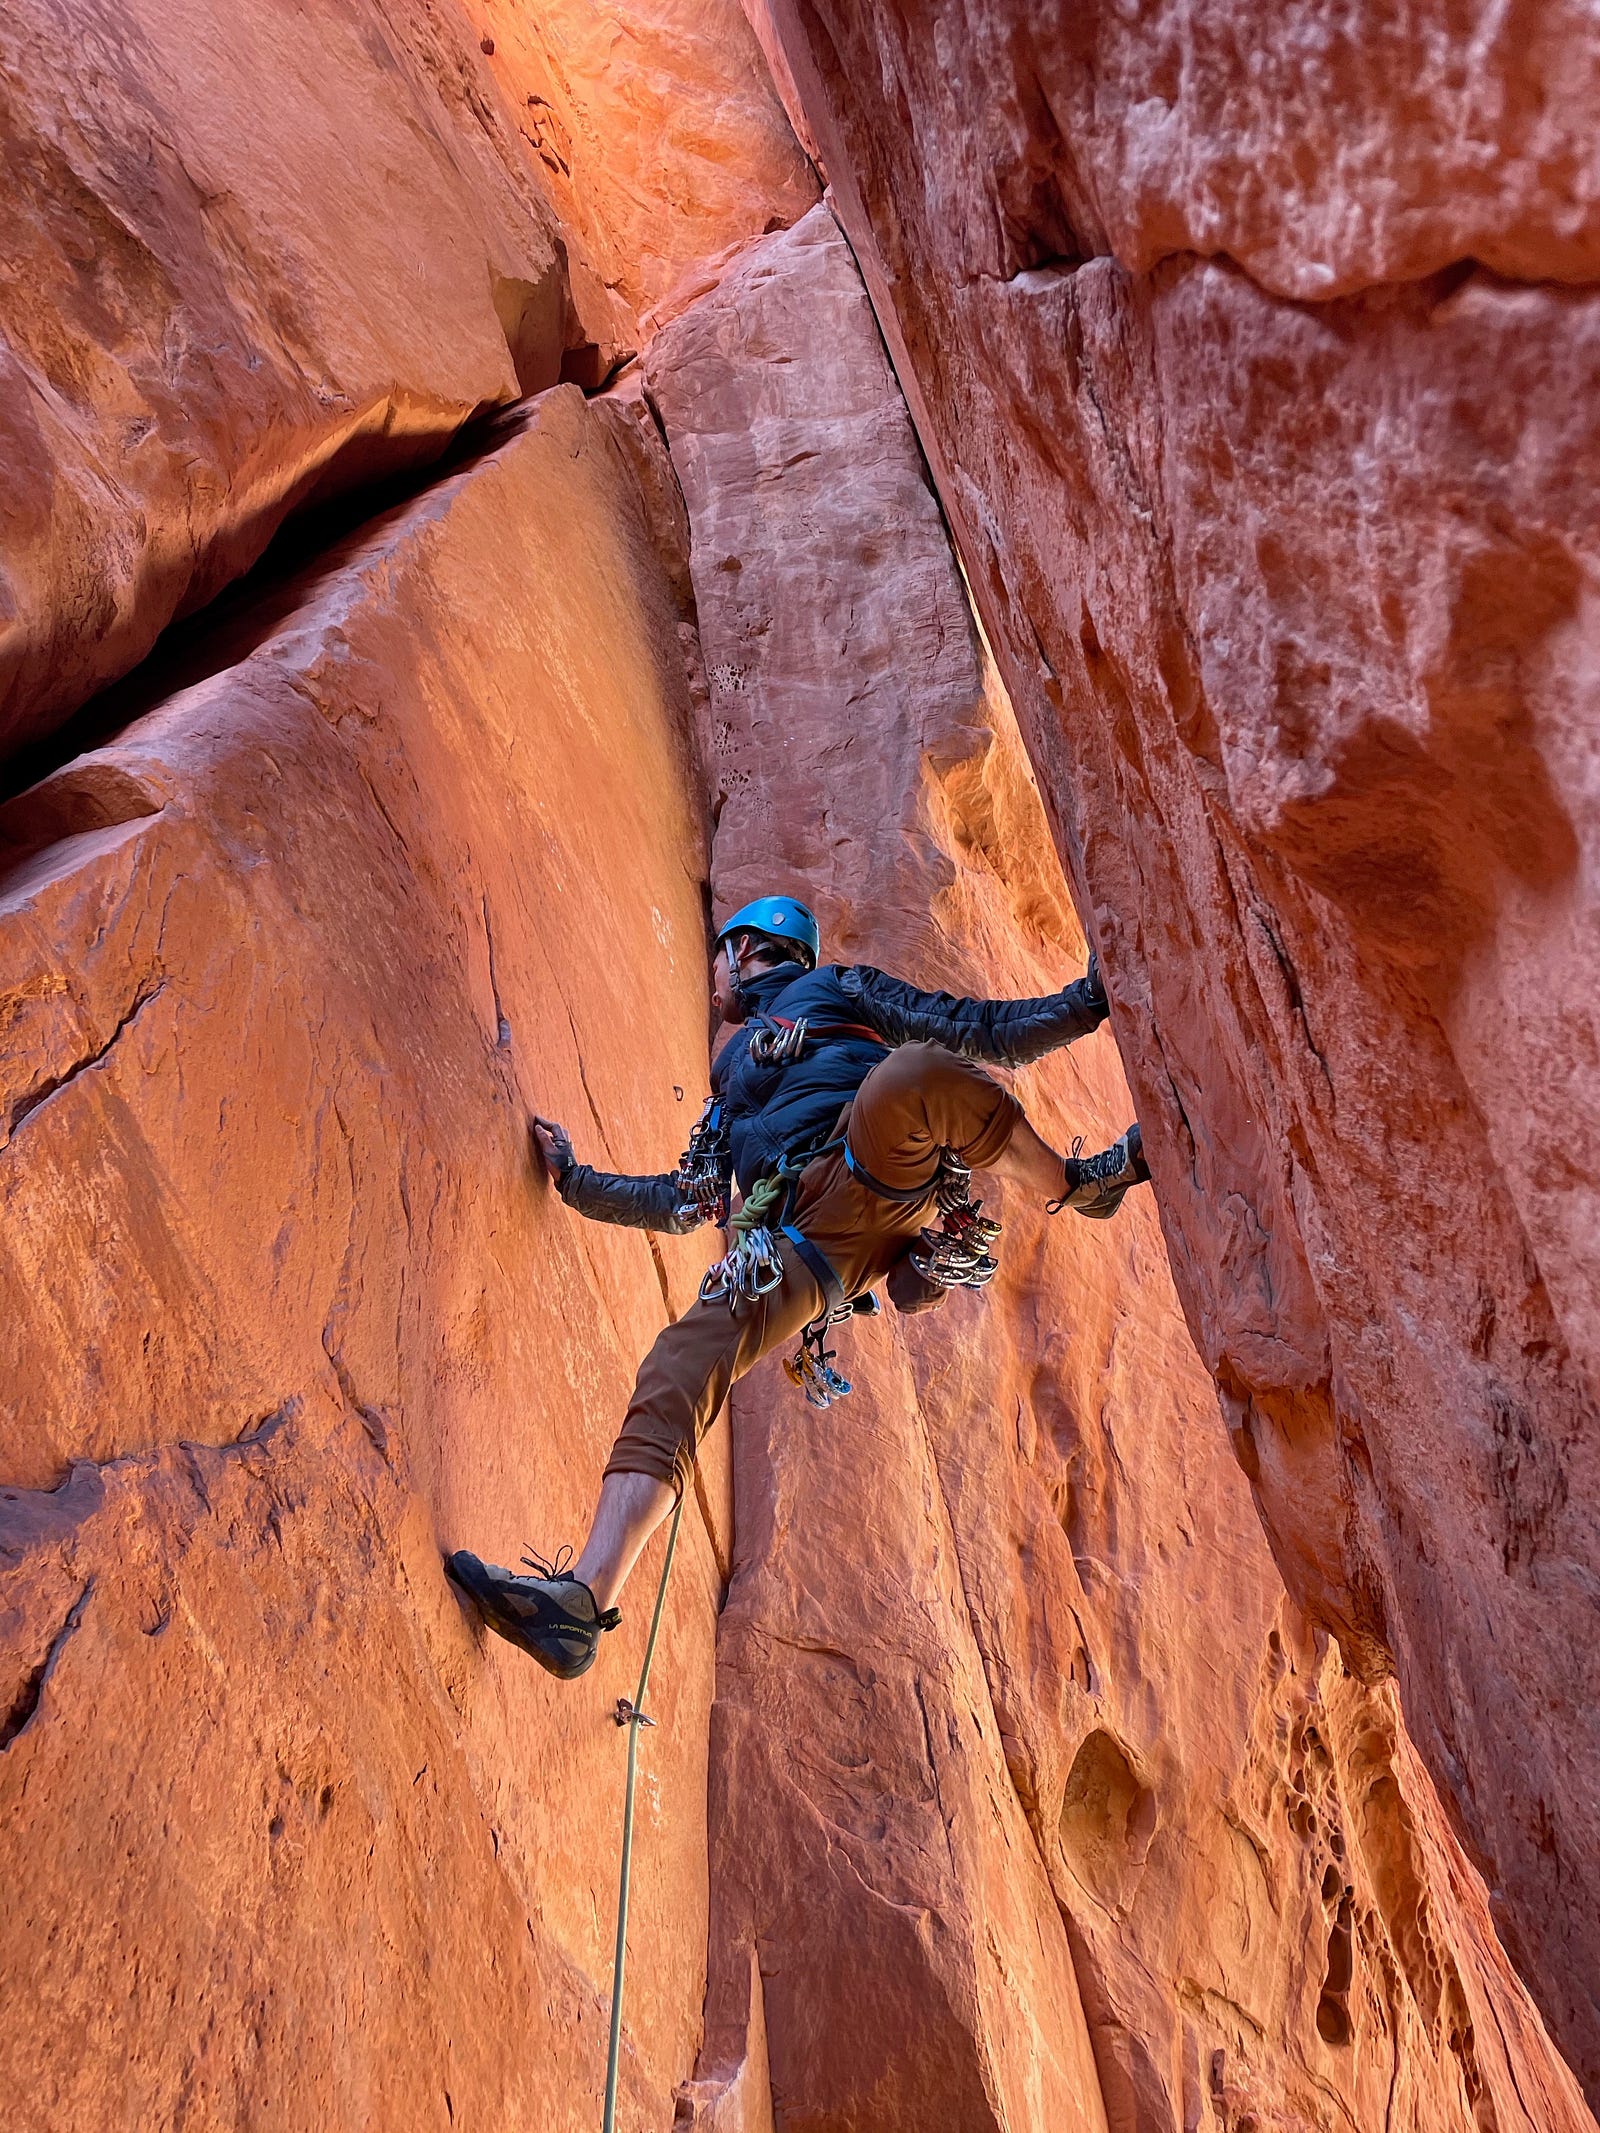 The Windows Route, Sedona, AZ
You should get back to climbing sooner rather than later, but there are some additional things to consider before, during, and after.
Before
Warming up is essential to reducing risk of injury. Personally, I’ve been preferring to warm up on the ground — on a mat and with exercise bands. But many swear by warming up on easy climbs, and ideally you should probably do both. Particularly in cold weather, it’s important to do one or two easy climbs to get blood flowing through the upper extremities. Biking to the gym and hiking to the crag don’t count. You have to warm up the upper body.
As far as warming up on the ground, at minimum you should do one exercise for each of the fingers, wrists, shoulders, and back. Open and close the hands rapidly for 30 seconds or so to get some blood flowing in the forearms. Do some wrist circles. Shoulder dislocates with an exercise band (or a stick clip) is a great way to start to open up the shoulder. Get creative with it — John Kettle has a great video if you need inspiration. Finally, get your back working with some band-assisted I’s, Y’s, and T’s. Be sure to keep a hollow body with the core engaged and the chest not popping out.
Grassroots Self Treatment has an excellent Climber’s Kit that is well worth the money. The warm-up section covers a great routine to use before climbing, including the I’s, Y’s, and T’s I just mentioned. Tom Merrick also has a really great Climber’s Mobility Routine. I prefer to pick and choose a selection of exercises to use for warm-up, such as the open- and closed-hand wrist circles.
During
If your elbows are acting up, there’s no amount of adapting your movement on the wall that will stop them from taking trauma. Be humble, and don’t push your limits. That said, assuming your symptoms are under control, there is a lot that can be done to mitigate strain on the elbows:
- Keep your elbows tucked in. Think about keeping the rotator cuff engaged such that the elbow crease opens outward (thumbs pointing up and out).
- Don’t hyperextend the elbows. Straight arms relieve unnecessary bicep tension, but a slight bend will ease the stress on your elbows.
- Pull your shoulders down away from your ears, but without excessively pulling the shoulder blades towards each other.
- Maintain good body tension with the core engaged in a hollow body position, especially on overhang.
- Vary your grips — especially if you’ve developed an unhealthy preference for crimping everything.
- If you start to chicken wing, get off the wall immediately.
Resources on how to hang right, such as this one, are a good starting point.
There’s a common misconception that endurance climbing is about economy of movement, and therefore all muscles should be maximally relaxed at all times. While saving energy is crucial to performance on endurance routes, it’s important to consider which muscles are relaxed. Think about how you can use good body tension with the larger muscle groups to keep from making risky movements and giving up on proper form. Generally speaking, as you learn more about proper form during supplemental exercises, try to carry that over to the wall.
After
Cooling down is just as important as warming up, and it’s the one that’s easiest to skip. The goal is to bring blood flow back to the tissues that just took a beating and help flush out the metabolic byproducts.
- Get some light cardio going — jumping jacks, a short hike, or even a brisk walk. Something to keep blood circulating through the upper body without loading the elbows.
- Light stretching — nothing aggressive, just enough to maintain range of motion while the muscles are still warm.
- Massage your forearms — even a quick 2–3 minute session with your thumbs (or an Armaid if you have one) can make a noticeable difference in how you feel the next day.
Supplemental Exercise
As I mentioned before, I break supplemental exercises into two categories: injury prevention and base fitness. Assuming pull exercises are paired with push exercises, as climbers there are specific risk areas — predominantly the pulling muscles of the upper body, from the back through the shoulder complex to the elbows, forearms, and fingers.
Injury Prevention
These exercises target the specific weak links in the kinetic chain that make climbers prone to elbow issues. The key areas:
- I’s, Y’s, and T’s — Target the lower traps and scapular stabilizers. Weak lower traps let the shoulders drift into compromised positions, which cascades down to the elbows.
- Rotator cuff work — Internal and external rotation with bands. The shoulder complex is the foundation of the entire pulling chain.
- FlexBar (Tyler Twist) — The go-to for lateral epicondylitis rehab. The eccentric load on the wrist extensors has good evidence behind it.
- Pronator exercises — Often overlooked, but the pronators share real estate with the flexor group near the medial epicondyle. Strengthening them can reduce strain at the attachment point.
- Collagen-stimulating exercises — Eric Horst recommends light, high-rep finger and wrist exercises done 15–30 minutes after taking collagen peptides, timed to coincide with peak collagen availability. The idea is that tendons have limited blood supply (relying on synovial fluid), so you need to specifically stimulate collagen synthesis at the site. I’ve been experimenting with a modified version using a GripSaver Plus — the verdict is still out, but the logic is sound.
- Isometric pinches and bicep curls — Isometric contractions (holding a static position without joint movement) are a well-established rehab tool for tendons. They can help manage pain and begin loading the tendon without the eccentric/concentric stress. Pinch blocks for the fingers, and static holds at 90 degrees for the biceps.
- Grassroots Self Treatment Climber’s Kit — Strength section — Esther Smith’s program is excellent and purpose-built for climbers. The strength exercises specifically target the upstream mobility and stability issues that lead to overuse injuries downstream.
- The 3 sidelying exercises — Sidelying external rotation, sidelying horizontal abduction, and sidelying forward flexion. These hit the rotator cuff and scapular stabilizers in positions that are hard to replicate standing.
Base Fitness
If you’re only climbing and doing injury prevention work, you’re missing a big piece of the puzzle. General strength conditioning reduces injury risk by building a more resilient body overall.
- Push strength — Push-ups, dips, overhead press. Climbing is almost entirely pulling, and the resulting imbalance is a recipe for shoulder and elbow problems.
- Core — Hollow body holds, hanging leg raises, planks. Good core tension on the wall reduces compensation patterns that strain the elbows.
- General strength — Squats, deadlifts, carries. A strong base supports everything above it. Don’t neglect the lower body just because you climb.
- Shoulder stability — Handstands, ring work, or even just wall slides. The shoulder is the most mobile (and therefore most vulnerable) joint in the pulling chain.
A couple of notes on supplemental exercise in general: be careful of elbow hyperextension, especially if you’re hypermobile. Even exercises with “proper form” calling for locked elbows (like planche progressions) may need to be modified with a slight bend. And vary your tools — alternate between dumbbells, exercise bands, and bodyweight. Each loads the tissues slightly differently, which is exactly the kind of varied stimulus that promotes resilient tendons.
Other Practices
Massaging
If for nothing else, massaging the body is a crucial means of monitoring it. Take your thumb and poke around in your forearms and around your elbows. Get a foam roller and roll out the underarm and latissimus dorsi. How does this change day to day? From morning to evening?
One word of caution: make sure you know the difference between a trigger point and a nerve. They can feel similar, but with practice there’s definitely a difference. In particular, the radial nerve runs right along the medial epicondyle on the tricep region of the arm, so try not to dig into that.
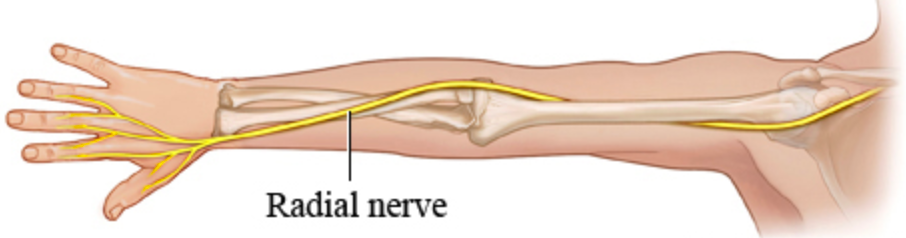 The radial nerve — know where it is so you don’t mistake it for a trigger point.
The budget tool for massaging the forearm is the thumb. If you want to get fancy, warm up some coconut oil or use massage oil.
That said, if you’re at all serious about climbing I would highly recommend just ponying up and buying an Armaid. It’s worth the investment. Even if you’re not suffering from elbow issues, the Armaid is a great tool for loosening up the forearm fascia while driving to the crag.
Another option is a massage gun. They’re getting affordable nowadays. Personally, I enjoy the gun, and it certainly hits differently than the Armaid, but if I had to choose one, the Armaid wins hands down.
Stretching
I’m putting this after massaging because, from experience, I haven’t actually found elbow-specific stretches to be all that important. That said, there are some mobility practices worth incorporating:
- Don’t overdo the wrist stretches — This is a common mistake. Aggressive wrist stretching can actually irritate the tendons further, especially during recovery. Gentle is the keyword.
- Grassroots Self Treatment Climber’s Kit — Mobility section — Esther Smith’s mobility work is well-balanced and climber-specific.
- Tom Merrick’s Climber’s Mobility Routine — Another great resource, though be cautious with the wrist-cranking portions if your elbows are sensitive.
- Radial nerve glides — These can be very helpful if nerve tension is contributing to your symptoms. They’re gentle movements that help the nerve slide through its surrounding tissues.
- Neck stretches (McKenzie method) — I was skeptical, but there is a nerve connection between the neck and the forearm. Some climbers swear by this. For me, it helped temporarily but wasn’t the silver bullet I was hoping for.
- Lattice Training’s stretching protocols — A solid general-purpose climbing stretch routine.
Icing
I’ve heard mixed things about icing. Some say it stimulates blood flow as the iced area warms back up. Some go so far as to claim it provides no benefit. But in the right circumstances, I have found icing to be very helpful.
There are some evenings where my elbows or hands just feel hot, or swollen. If it’s really bad it will keep me up at night. On these evenings I will ice the hands, forearms, and elbows, and I can say for certain it helps with sleeping — and I generally feel better the next day.
Be sure to ice only as the final activity of the day, after any exercise, stretching, or massaging is complete. Bonus: take a hot shower after icing to get a bit of hot-cold therapy.
NSAIDs
 Maple Canyon, Utah — where an unexpected conversation changed my approach.
Last summer I was in Maple Canyon, Utah, and decided to hike up to the Pipe Dream Cave to check out the all-stars. At a lull between attempts on one of the center-cave lines, I asked a man in his 60s or 70s what his experience with elbow tendonitis was, and if he had any advice. He responded with a question: “What’s the max amount of ibuprofen you can take in a day?”
I’d like to stress again that I am not a medical professional and none of these personal observations should be taken as formal advice.
Nonsteroidal anti-inflammatory drugs (NSAIDs) are yet another topic where I’ve heard a whole spectrum of opinions. Some say NSAIDs hamper the natural healing process and should be avoided. Others say that the natural healing process is really bad at healing tendons and should be hampered with. But the majority would say NSAIDs are going to be beneficial if used at the right dosage at the right stage.
The way I’ve experimented with NSAIDs (specifically ibuprofen) breaks down into three categories:
- Preventative/anticipatory — If I know I’ve been struggling recently, I’ve sometimes taken 400 mg before climbing.
- Post-workout — End of day, elbows feel “hot,” want to get a good night’s rest. Sometimes 400 mg in the evening. I think of this almost exactly how I think of icing.
- Multi-week stint — Taking a regular amount daily for a month straight.
Category 3 might sound extreme, but it requires some context. While I wouldn’t recommend taking NSAIDs for a prolonged period, someone recommended that I take a regular amount daily for a month. At the time I was roughly 1.5 years into my elbow issues and was teetering on the edge of recovery but just couldn’t quite avoid the occasional flare-up. I started taking 400 mg three times a day (1200 mg total — which, by the way, is the maximum recommended daily dosage on the label). I felt good the entire month, but I was anxiously anticipating the day I stopped. Well, that day came and went, and my symptoms never really came back.
This was probably the biggest turning point in my entire epicondylitis journey, and I am yet to have any major flare-ups since. Why then, you may ask, is this tucked away in a subsection that isn’t even mentioned in “The Big Four”? Well, I’m reluctant to attribute too much to a drug-based solution — particularly when there were other significant factors at play. The Big Four is a collection of recommendations I’m confident will help, not only with recovery but also with long-term health and prevention. The turning point I’m describing here was, without a doubt, built on months of rehabilitative exercise and all the other aforementioned factors. Was ibuprofen also an important factor in this late stage of recovery? My gut tells me yes, but it’s hard to know for certain. What does this mean for you? I’d recommend NSAIDs as a valuable addition to your tool belt, but they are certainly not a panacea.
Diet and Supplements
It should go without saying that if you’re putting all of this time and effort into your climbing, you should be respecting your body with good food as well. I won’t elaborate much here — there are plenty of good resources on diet, both general and climbing-specific.
“Eat food. Not too much. Mostly plants.” — Michael Pollan
Most workout days I make a post-workout whey protein shake and load it with greens and fruit. Hemp seed powder, pea protein, flax meal, and spirulina are all good high-protein vegan options to mix in.
As I mentioned, I’ve been experimenting with pre-workout collagen peptides, but it’s difficult to say if they make any difference. From what I’ve read, it seems like it won’t hurt — something that can’t be said for many supplements.
At the bottom of my list of recommendations: I’ve also been taking a daily fish oil supplement accompanied by a daily dose of skepticism.
Acupuncture and Dry-Needling
I’ve yet to really experiment with either of these methods. I did have a dry-needling session recently, but since I was essentially asymptomatic at the time it felt like it did more harm than good. Anecdotally I’ve heard good things about both (more often dry-needling), and I’ll consider it again in the future if symptoms return.
Taping and Braces
I haven’t really tried taping, but there are sources that recommend both rigid tape and K-tape. I did use tennis elbow braces during the early acute phase. They were particularly valuable with typing, since that was something I couldn’t easily take a break from.
In the acute phase of epicondylitis, these strategies can provide some relief while climbing, but in the category of “relief while climbing” I had better luck with NSAIDs.
Rest
Rest is the easiest thing to recommend and the hardest thing to actually do. Two things to keep in mind:
- Enough rest days in a week. If you’re climbing three days a week, make sure they’re not three days in a row. Your tendons need recovery time between sessions, and unlike muscles, tendons are slow to heal and slow to adapt. Two to three climbing days per week with rest days between them is a good starting point during recovery.
- Take a week or two off a few times a year. Periodized programs usually build this in, but if you’re not following one, schedule it yourself. These rest periods give the tendons a chance to fully catch up on repair. I know it feels like you’re losing fitness — and you are, a little — but the long-term payoff of healthy tendons far outweighs a minor detraining blip.
Conclusion
If I’m being honest, the root of my tendonitis was indoor over-training during those Michigan winters — high volume, no structure, all enthusiasm and no planning. It took me a long time to admit that.
I owe a lot to the physical therapists I’ve worked with. PTs have been the most true to this holistic approach, but it’s hard to imbue the level of dedication required in a 45-minute appointment. This kind of shift — in how you view your body, your training, your entire relationship to climbing — has to come from within.
A few final thoughts:
- Everyone is different. My journey is not going to be your journey. The specifics of what worked for me may not work for you, and vice versa.
- Listen to your body. This is the most vacuous advice in all of fitness, and it’s also the most important. You’ll only learn what it means through practice.
- Consult a professional. Or two. Or five, as I did. Different PTs bring different perspectives, and sometimes the fifth one tells you the thing that clicks.
I’m not sponsored by any of the products or resources mentioned here. Maybe I should be? But honestly, I’d rather this remain an unbiased account. Take what’s useful, discard what isn’t, and remember that the goal isn’t to follow some perfect protocol — it’s to develop the knowledge and body awareness to take care of yourself for a lifetime of climbing.
I’d love to know if you found this useful.
Educational Resources
- Rock Climber’s Training Manual — Mark and Mike Anderson
- Training for Climbing — Eric Horst
- Climbing Injury Free — Dr. Jared Vagy (note: while I agree there is an acute unloading phase where the injury needs immediate relief, I think strength, mobility, and movement should be constantly worked on in harmony, rather than being sequential phases of a pyramid)
- One Move Too Many — Dr. Thomas Hochholzer and Volker Schoffl
- Esther Smith on Elbows — TrainingBeta Podcast
]]>